 Welcome to Part 2 of my multi-part guide on Installing Arch Linux alongside macOS on a Mid-2014 MacBook Pro with full disk encryption.
In this part, I’ll walk through partitioning and encrypting the hard drive—for me, one of the trickier stages in the installation process!
Navigation:
- [Start here first!] Part 1 - Preparing MacOS, Starting Arch Installation and Configuring Wireless Adapter
- [This one] Part 2 - Disk Partitioning and Encryption
- Part 3 - Base Arch Linux Installation
Disk Partitioning and Encryption - Second Challenge!
Partitioning can be complex, especially when balancing dual-boot requirements with encryption. This section details the second big challenge (first challenge in Part 1) I faced in this process.
The EFI Boot Partition Issue
Originally, I planned to re-use the existing ~200MB EFI system partition (Shrink MacOS partition in Part 1) to boot Arch Linux as well. However, during the initial ramdisk generation step with mkinitcpio (more on this in Part 3), the EFI partition quickly ran out of space, causing the process to fail.
After some research, I discovered resizing the EFI partition carried a risk of corrupting the macOS installation. So, a better approach was to create a dedicated second EFI partition for Arch Linux, which is exactly what I did.
Have any alternative suggestions? I’d love to hear them in the comments! Disk partitioning approaches vary widely, and I’m interested in learning new approaches.
LVM and Disk Encryption
I also decided to use (and learn!) Logical Volume Management (LVM) along with disk encryption. Here’s why:
LVM allows for:
- Flexibility in resizing partitions (or “logical volumes”) more easily than with traditional partitioning methods.
- Future growth and reconfiguration potential, such as adding partitions or resizing them as needs change.
- Good integration with encryption (covered below).
Disk Encryption because:
- It ensures all data is protected. Without encryption, the data could be easily read if someone accessed your hard drive directly.
- By encrypting the full LVM Volume Group, all partitions added to it are encrypted by default.
With LVM and encryption set up, inside the Volume Group, I’ll create root (for the system root), home (for user data), and swap partitions.
The Big Picture
The final partition scheme will look something like this (with approximate sizes):
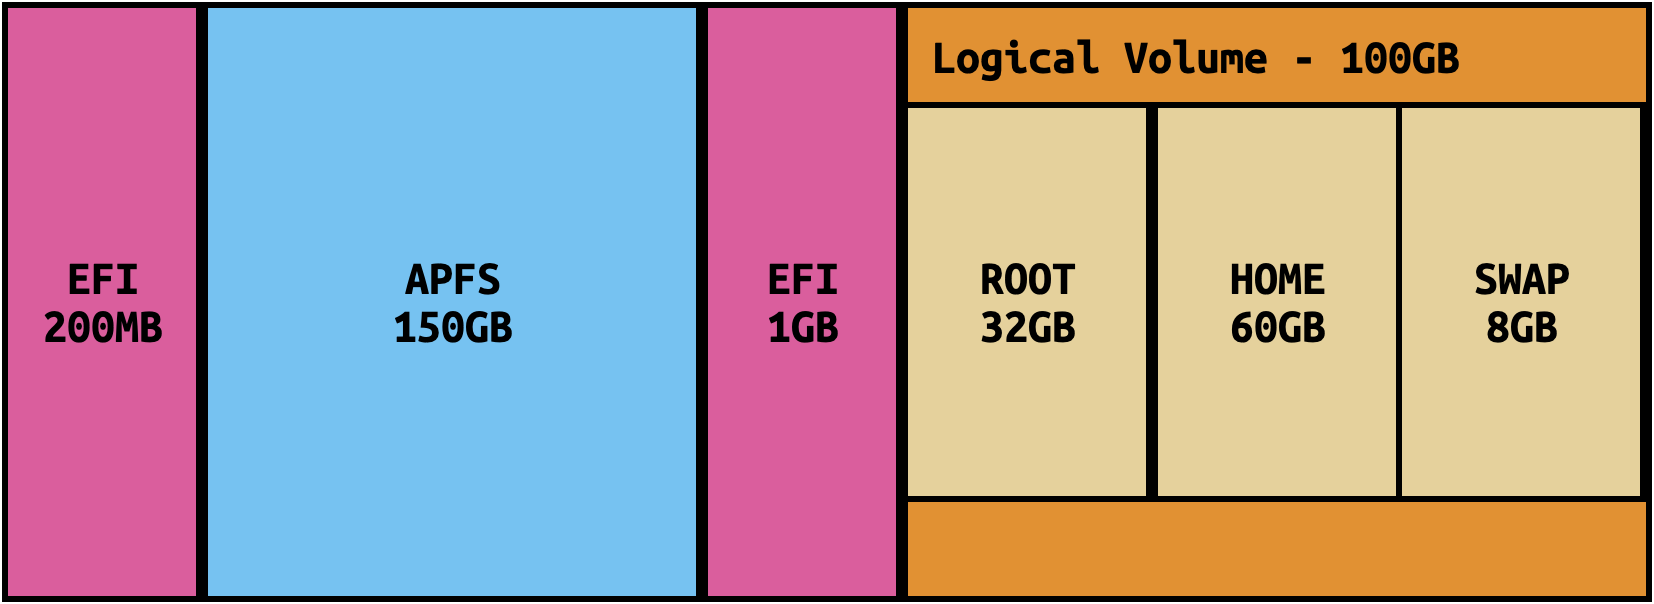
If you are not going for dual boot and plan to remove MacOS completely: delete the 200MB EFI and APFS partitions in the “Disk Partitioning” section. Then, expand the root and home partitions to use the full disk.
Let’s get to work!
Disk Partitioning
If you are not going for dual boot and plan to remove MacOS completely: After Step 2.b below, delete (
dcommand) the 200MB EFI (partition1) and APFS (partition2) partitions, similar to how the temporary 100GB partition is deleted. Adjust partition references accordingly. (partition3and partition4, become partition1and2, respectively).
- Identify your hard drive with
lsblkorfdisk -l, in my case it issda. - Start partitioning the disk by running
fdisk /dev/sda. Changes won’t be saved until the last step (wcommand), so you can safely explore (qcommand for quitting without saving). Once inside fdisk:- Print the current partition table with
pand examine it. - Delete the temporary 100GB partition created in Part 1 to make space. Use
d(elete) command and select the partition 3 when prompted. - Create the new EFI partion:
nfor new partition, leave3(the default) as the partition number, and keep the first sector default. For the last sector, enter+1Gto allocate 1GB. - Change the partition type to EFI:
tfor type, select partition 3, enterLto list all types. Look for “EFI system” and take mental note of the number. Pressqand enter the number (1 in my case) - Create a new partition for LVM:
nfor new partition, leave4as the partition number, and accept the default first and last sectors to fill remaining space. - Change partition type to LVM:
t, select partition 4, enterL, and select “Linux LVM” (44 in my case) - Print the partition table with
pand verify it includes four partitions. Theroot,homeandswappartitions will be created within LVM next. - If everything looks correct, commit the changes by pressing
w.
- Print the current partition table with
Creating encrypted LVM
- Initialize and format
/dev/sda4with LUKS (Linux Unified Key Setup):cryptsetup luksFormat /dev/sda4. EnterYESwhen asked if you are sure. Choose the encryption password (should be a strong and secure one!). - Unlock and mount the freshly created partition (
cryptlvmis the name of the mounted container):cryptsetup open /dev/sda4 cryptlvm. Enter password when prompted - Set up the LVM physical volume:
pvcreate /dev/mapper/cryptlvm - Create the Volume Group (I named mine
macbooky):vgcreate macbooky /dev/mapper/cryptlvm - Inside the Volume Group, create the logical volumes for
swap,rootandhome:
lvcreate -L 8G macbooky -n swap
lvcreate -L 32G macbooky -n root
lvcreate -l 100%FREE macbooky -n home- Format and create the file systems:
mkfs.ext4 /dev/macbooky/root
mkfs.ext4 /dev/macbooky/home
mkswap /dev/macbooky/swap- Let’s also format the (non encrypted) boot partition:
mkfs.fat -F32 /dev/sda3- Mount all the file systems and activate the swap partition:
mount /dev/macbooky/root /mnt
mount --mkdir /dev/macbooky/home /mnt/home
mount --mkdir /dev/sda3 /mnt/boot
swapon /dev/macbooky/swap
And that’s it! With the disk configured, we’re ready to begin the actual Arch Linux installation.
Base Arch Linux installation
Continues in Part3…